Saturday 19 August 2017

This Special Day

Hello and Welcome
Playing with some Penny Black stamps and my much loved Distress inks.

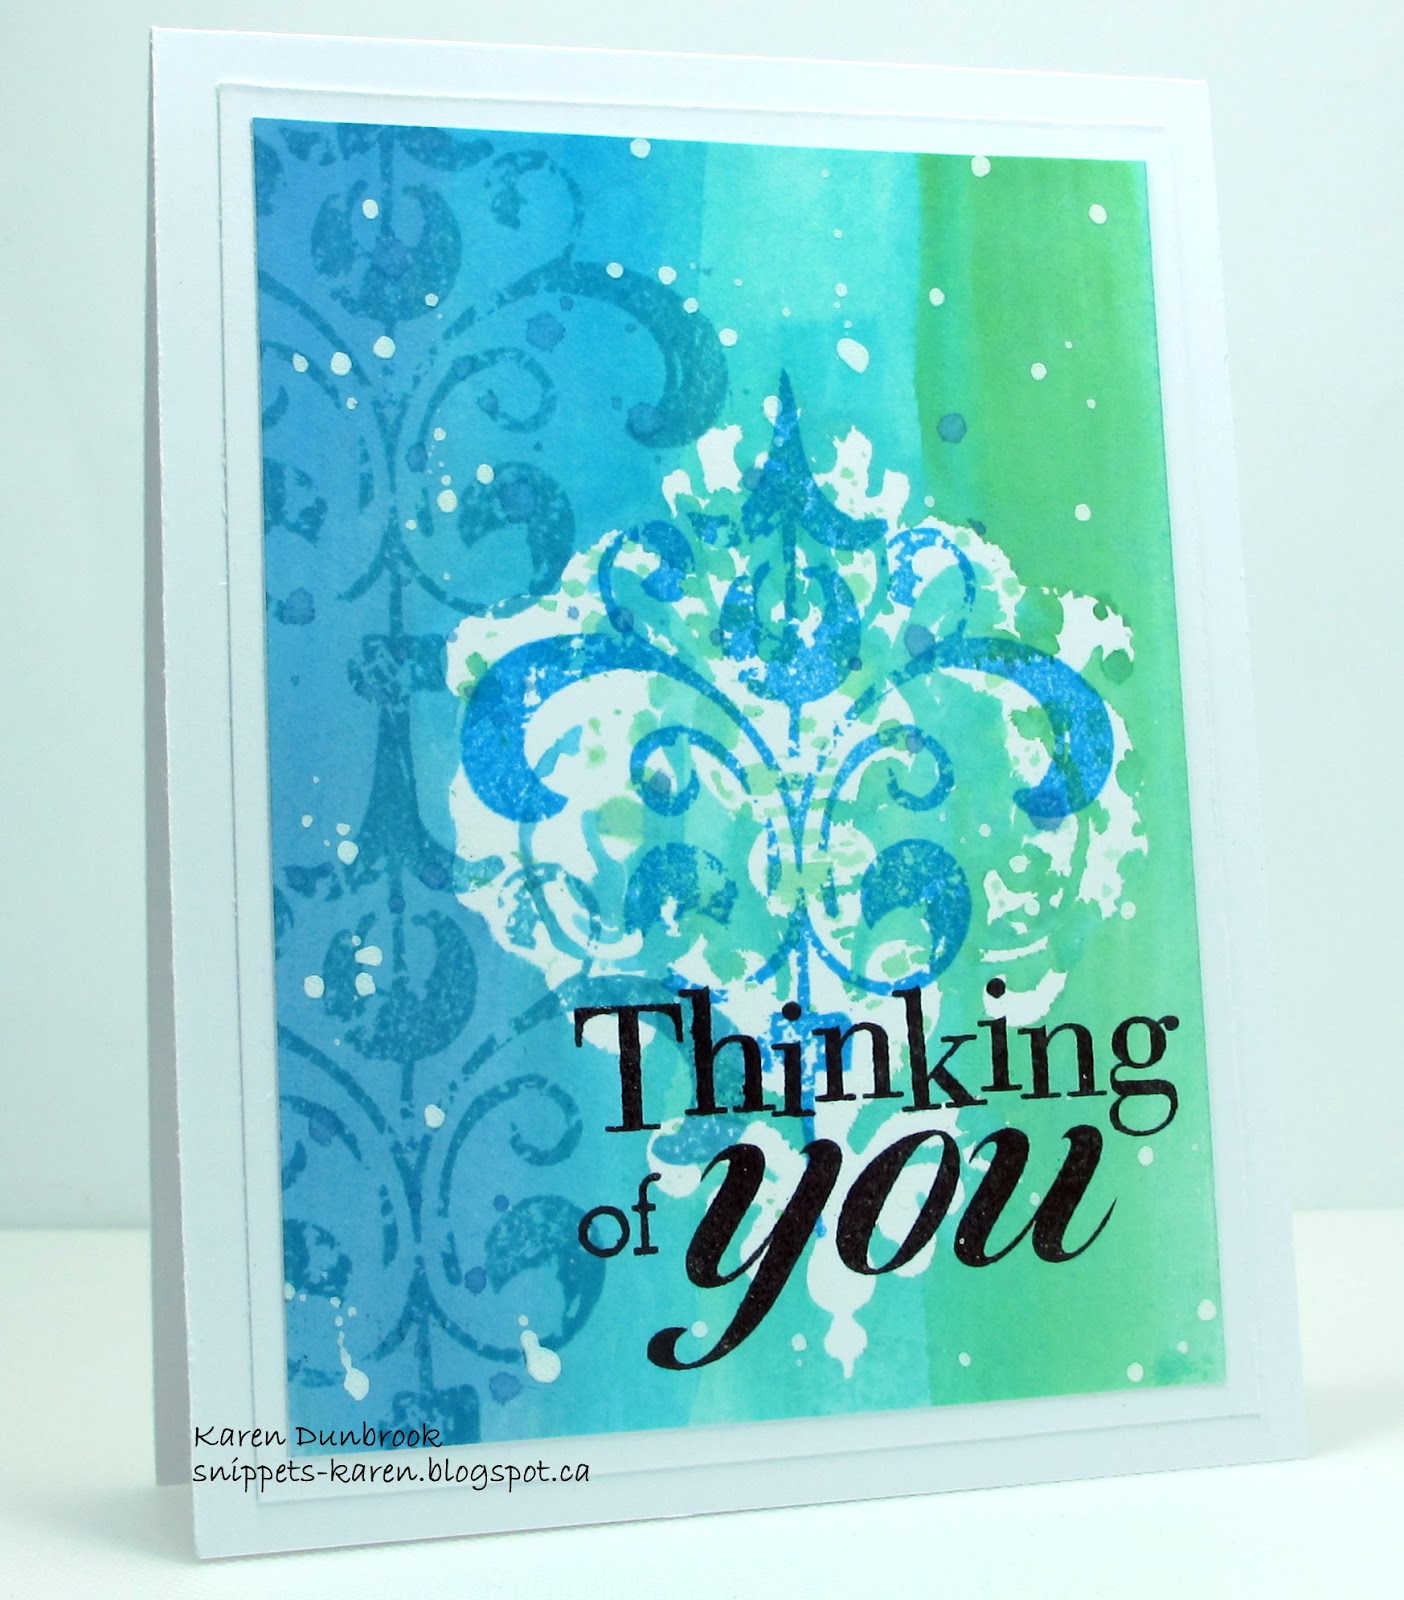
I began by placing the Delicate Florals inside my Misti, inked with Versamark, stamped then clear heat embossed with my heat tool.  That created a resist that I could ink over the top of.
Using my foam inking tool, I began on the top right corner, rubbing Peacock Feathers Distress ink onto my white cardstock.  I continued next with Salty Ocean then Faded Jeans at the bottom trying to blend all the colours as I went along.  

I stamped the sentiment from the Treasured Sentiment collection with Memento black ink then using some water, I splattered it over my card front to lift some of the colour and add interest.


Have a great weekend and thanks so much for the visit.

Supplies
Stamps- Delicate Florals, Treasured Sentiments (PB)
Ink- Peacock Feathers, Salty Ocean, Faded Jeans Distress (TH); Versamark
Paper- heavy white (local store)
Accessories and Tools- clear eb powder; heat tool; sponge applicator; Misti

Friday 18 August 2017

Thoughts of You

Good Morning.

I found a flourish mask that I have had in my stash for years.  I don't know who made it or where I got it but it was the starting point for my card.

 I applied the mask to my white cardstock, then using different colours of Distress inks I watercoloured bands of colour onto my card front.  Just press the ink pads directly onto a non-stick pad, add some water and use a paint brush to paint with.  I used a wide bristle brush and kept adding colour until I was happy with the tones.  When I removed the mask, the white area of the card was left behind.
  Next, using the flourish from Technique Tuesday I stamped that over the white masked area and to the left for interest.  It created kind of a shadow effect.
I stamped the sentiment from an old Hero Arts set then splattered with white acrylic paint to help brighten up the whole card.


Thanks so very much for coming by and taking a look.
Have a great Friday!


Supplies
Stamps- Flourishes (TT); Write Your Message (HA)
Ink- Distress:  Salty Ocean, Peacock Feathers, Cracked Pistachio (TH); 
Tuxedo Black Memento
Paper- heavy white (local store)
Accessories and Tools- Misti; white acrylic paint; paintbrush; mask ?

Thursday 17 August 2017

Feel With Your Heart

Meet today's card.

Last week, I was playing along with some of the great challenges over at Splitcoast Stampers and this is the card I came up with.
Very simple stamping and sponging.

I love this great sentiment from Rubbernecker, stamped it first so I could get an idea where to put my flowers. 
Next, I stamped the flower from Magenta and wanted to try and ground them by adding some colour and stamping behind.  I sponged the edges and added some Nuvo drops and done.


Thanks for taking a look.

Supplies
Stamps- Words (Rubbernecker); Clover Silhouette (Magenta); PTI dots
Ink- Tuxedo Black Memento; Salty Ocean, Peeled Paint Distress (TH)
Paper- heavy white (local store)
Accessories and Tools- Misti; sponging tool (TH); Nuvo Drops

Wednesday 16 August 2017

Just a Bit More Salt- The CAS Watercolour Challenge

Hello
It's time for another card for the 


It's been such a fun month playing with salt and trying to see the results we can achieve using it.
There are some really great links on the main blog for you to try and some wonderful cards to inspire.

So for my card, I began with a piece of the heavy white cardstock I usually use.
I sprayed it with water, then dropped drips of Distress re-inkers onto the wet paper.  I sprayed again to help blend the colours then sprinkled on some Sea Salt and left it to dry.
Love how the salt absorbs the ink and leaves behind a beautiful patterned piece of card.

To keep it simple, I die cut a frame and mounted the inked piece behind that.  I die cut the flowers and added them over the piece.
I scored diagonal lines on my card front to add more interest and pop dotted the framed salted piece over that.


 Thanks so much for coming by and taking a look.
I hope you will play along with us.


Adding my card to these challenges:

Simple Create Too- FLOWERS 
Crafty Creations- ANYTHING GOES 
The Crafty Addicts- ANYTHING GOES/ GIRLY OPTION
Paperminutes- ANYTHING GOES

  
Supplies
Stamps- none
Inks- Distress Re-inkers: Salty Ocean, Cracked Pistachio, Peeled Paint,
 Peacock Feathers (TH)
Paper- heavy white (local store)
Accessories and Tools- Wonky Stitched frame (Avery Elle); ScorPal, 
Hollyhocks die- Impression Obsession; Cuttlebug; foam dots

Tuesday 15 August 2017

Background Stamping- The Flower Challenge

Good Morning

Time for another card for 


This is a great challenge to use stamps to create your own background paper.

I began by placing my flower stamp from the Blooming with Kindness set inside my Misti, inked with black Memento ink and stamped them randomly over my card front.
Instead of colouring the flowers, I decided to colour in the background so the lovely details and features of the flowers would really show up.
I splattered the bkg with some diluted ink then cut the panel to add interest.
The sentiment was stamped and then I punched it into a circle.  I pop dotted it and added the enamel button.


Thanks so much for coming to visit.
Hope you get a chance to play along with us.


Adding my card to these challenges:
Crazy 4 Challenges- MONOCHROMATIC
Sweet Stampin'- FLOWERS
Simply Create Too- Flowers


Supplies
Stamps- Blooming With Kindness, Think Happy Thoughts (SU)
Inks- Tuxedo Black Memento
Paper- heavy white (local store)
Accessories and Tools- Misti; circle punch (SU); black enamel button; Copic markers, foam dots

Monday 14 August 2017

Froggy Wishes

Kids cards....fun and easy.
Here's one I made for a special little girl.

I picked up this adorable frog stamp and die from the last craft show I attended and wanted to use it.
I began by placing the frog inside my Misti and randomly stamped it over my card front.

I stamped it again and using the die, cut it out then coloured it with my Zigs.  
I die cut a circle then stamped the sentiment and glued the coloured frog over that.
Very quick, happy feeling card.


Thanks for coming by and taking a look.

Adding my card to these challenges:
Simon Says Wed.- FOR A CHILD

CASology- SAFARI
CAS on Friday- BIRTHDAY


Supplies
Stamps- Happy Birthday (Studio G); Mini Sticky Note (YNS)
Ink- Tuxedo Black Memento
Paper- heavy white (local store)
Accessories and Tools- Misti; circle die (Spellbinders); frog die (YNS); Copic Markers;
foam dots

Sunday 13 August 2017

In the Moment

Good Morning.

I have been enjoying playing with my Distress Oxide inks and seeing what I can come up with.
For today's card, I rubbed DOX right onto my non-stick craft mat, sprayed with water and dragged my paper through the ink.  Love how it layers and give sort of a 'chalky' look to the texture of your card.  I kept pressing my paper into the ink using 2 different colours until I was happy with the coverage.

I then placed my inked piece inside my Misti and stamped this great sentiment first so I would know how much room I had to stamp the flowers.
I stamped the flowers in black and then to add interest, I stamped them again using more of the same colour of DOX that I had used for the bkg. to give a shadow effect.
I splattered on some water to lift some of the colour...another fun effect you can achieve with these inks.
Pretty simple and straightforward.  


Thanks so much for the visit.
Enjoy the rest of your weekend.


Adding my card to these challenges:
Craft Stamper Magazine- ANYTHING STAMPED GOES
Crazy 4 Challenges- MONOCHROMATIC
Sweet Stampin'- FLOWERS


Supplies
Stamps- Wildflower (TH); Beautiful Moments (Close To My Heart)
Inks- Tuxedo black Memento; DOX- Broken China, Cracked Pistachio (TH)
Paper- heavy white (local store)
Accessories and Tools- Misti; Mister (TH)

Saturday 12 August 2017

Get Well WIshes

Good Morning.

I created a get well card for you today by using the  
Stencil Monoprinting technique for the background.

So for those of you that are not familiar with this technique, you ink the stencil with a water based ink, spray it with water and press it onto your paper.  You will get a more loose, open look from the stencil but I really like the results you can achieve.  It is also another way to get a different look using the stencils you already have on hand.
Next, I placed the flowers stamps from Tim Holtz and Magenta into my Misti, inked with Tuxedo black and stamped.  I filled in some of the areas on the side where the ink didn't quite make it using the Mixed Media stamps from Stamplorations.
The sentiment is from Studio G.


 Have a great weekend and thanks so much for the visit.


Adding my card to these challenges:
Cards and More- DOTS, DOTS, DOTS
Lemon Shortbread- ANYTHING GOES
A Bit More Time to Craft- ANYTHING GOES


Supplies
Stamps- Wildflowers (TH); Mixed Media (STAMPlorations); Flower Silhouette (Magenta)
Get Well- (Studio G)
Ink- Tuxedo Black Memento; Distress- Faded Jeans, Salty Ocean (TH)
Paper- heavy white (local store)
Accessories and Tools- Misti, stencil- burlap (TH); Mister (TH)

Friday 11 August 2017

Queen Anne's Lace

Good Morning.
Meet today's card.

I made this one using a very fun technique called Tissue Paper Watercolour.
Please check out the great video my friend 

So I began by re-inkers directly onto my non-stick craft mat, sprayed with water then pressed the tissue paper into the wet ink.  
It is good to have some wrinkles and bumps in it, they add interest.  
I then set it aside to dry.  That's the hard part, the wait.  You could also help it along by drying it with a heat tool but I decided to be patient.
When it was dry, I glued it onto a piece of acetate and let it dry.
** I didn't have any regular acetate on hand but I do own a laminator, so I laminated one of those sheets together and used that.  It was nice and sturdy and great to use!! ** 
I die-cut the flowers from the TH Wildflowers and glued it over the acetate side.
Lastly, I die-cut the Wonky Stitched frame, mounted my piece behind the frame and pop-dotted it onto my plain white card front.


Thanks so much for coming by and taking a look!!

Adding my card to these challenges:
Crazy 4 Challenges- Bright and Cheerful
CAS on Friday- EXOTIC
Crafty Creations- ANYTHING GOES
Paper Minutes- SUMMER


Supplies
Stamps- none
Inks- Re-inkers- Peeled Paint, Faded Jeans, Peacock Feathers (Ranger)
Paper- heavy white (local store); tissue paper
Accessories and Tools- Wonky Stitches (Avery Elle); Wildflowers (TH); laminator; 
laminating sheet; Tombow Mono Aqua glue

Thursday 10 August 2017

Washi Notecard

Welcome.
Here is a simple notecard I made using washi tape I have sitting in a drawer.
I need to try and use more of the things I have...I know what you are saying...'yay, right!'

I began with a piece of heavy, white cardstock and put stripes of washi tape on the diagonal.  I left space between the rows so I could add some scored perforations using my ScorBug on my ScorPal.  It gave nice texture and more interest to my card front.
For those of you that have never used washi before, it is so easy to lift and move around it you don't get it straight the first time without ripping your paper.
Next, I die-cut the flowers in black and white and glued them over the tape. 
I chose to mount the piece onto blue cardstock just to give it some colour.

It's nice to have some little notecards on hand.


Thanks so much for taking time to visit. 


Adding my card to these challenges:
Crafty Creations- ANYTHING GOES
Mod Squad- BLACK, WHITE AND ONE OTHER COLOR
Sunny Day Crafting- "F" FOR FLOWERS


Supplies
Stamps- none
Ink- none
Paper- heavy white (local store)
Accessories and Tools- ScorBug, ScorPal, Washi, die- Clover (Poppystamp)

Wednesday 9 August 2017

Jumping for Joy

Good Morning.
Simple, happy card today using a technique I showed a few weeks ago that I called 
Basically, it is stenciling over a stencil.

I began by masking my card front using Painter's Tape then using some Peeled Paint Distress ink and stenciled the TCW Chicken Wire as the bkg.  I then took some drywall tape and stenciled over that using Peacock Feather.
Using my Misti, I stamped this wonderful image then this fun sentiment.
I clear heat embossed both to help make the black pop.
Lastly, I splattered some diluted Distress ink to look like rain and rubbed more ink along the card edges.


Thanks so much for coming by and taking a look.


Adding my card to these challenges:
Simon Says Wed.- SPLATTER IT
Shopping Our Stash- SPICE UP YOUR LIFE
(Sporty Spice-she jumps around so much on stage)
Addicted to Stamps and More- CAS
Use Your Stuff- INSPIRED BY A QUOTE
Just Us Girls- SHOWERS

Supplies
Stamps- Fruit Loop (Verses);  Rain Dance (Technique Junkies)
Ink- Peacock Feathers, Peeled Paint Distress (TH); Tuxedo Black Memento
Paper- heavy weight (local Store)
Accessories and Tools- Misti; drywall tape; cl embossing powder; heat tool; paintbrush; 
sponge applicator


Tuesday 8 August 2017

Beach Life

Good Morning.
As I mentioned in a previous post, I am playing along with some of the challenges at Splitcoast.
This was a long weekend here for us, so I had time to play.
I made 2 cards using the same stamps but totally different techniques which I will do my best to explain.

The card above was really an experiment to see what would happen if I used hot glue on my cardstock.  I had read about a technique using it with heat embossing so thought I would give it a whirl.
I began with heavy weight cardstock and squeezed a line of hot glue onto my paper.  While it was still hot, I used a credit card to pull the glue downwards and really didn't know what to expect.  Before it cooled, I sprinkled on some white embossing powder and melted that with my heat gun.  After it cooled, it reminded me of water and a wave so I inked up the background with Distress Oxide ink and then using my Misti, stamped the birds and the sentiment.
Fun to try something new.


The second card is more straight forward.

For this card, I watercolored the background using Distress inks, then using my Misti, I stamped the same birds as above.  
For the card front, I used a piece of drywall tape to stencil using Peeled Paint and Mowed Lawn Distress inks.  I thought the green was a nice compliment to the colours in the scene.  I stamped the sentiment from Mama Elephant using black Memento ink and mounted the scene over the bkg using foam dots.


Well there you have it.  Two different cards using the same stamps.
 Thanks so much for the visit!


Adding my card to these challenges:

Use Your Stuff- QUOTE
(quote on my card)
 A Bit More Time to Craft- ANYTHING GOES
Create and Inspire- ANYTHING GOES
NordSalten Hobby Club- BLUE
Stempelgarten- SUMMERTIME

Supplies
Card #1
Stamps- Flying Crane, Standing Crane (Frog's Whiskers); 
Everyday Beauty (Impression Obsession)
Ink- DOX- Salty Ocean; Memento black
Paper- heavy weight (local store)
Accessories and Tools- Misti; hot glue; credit card; white eb powder; heat tool; sponging tool

Card #2
Stamps- Flying Crane, Standing Crane (Frog's Whiskers); Everyday Greetings (Mama Elephant)
Ink- Distress ink- Salty Ocean, Peeled Paint,Seedless Perserves
Paper- heavy weight (local store)
Accessories and Tools- Misti; drywall tape; foam dots; paintbrush

Monday 7 August 2017

Rainbow Wishes

Good Morning.
I've had some extra time this long weekend to make some cards which has been fun.
I am also playing along with some of the challenges at Splitcoast Stampers for their big event held every year with contests and prizes for it's members.  I just love it there and I am always inspired by the creative spirit found there.  It is such a wonderful community of people.

This was a simple card, tried to make it more masculine and fun.
I began by placing the Shattered Glass stamp inside my Misti, inked with Versamark and pressed onto my heavy weight paper.  I then clear heat embossed the image.
Next, I pressed my Distress Oxide ink pad directly onto my non-stick craft sheet.  I wet a section of my card front with water and using a paint brush, dripped the inks onto that area.  I continued around my card front adding the different colours and letting the inks run over each other.
When the piece was dry, I stamped the birthday sentiment in the center using my Misti and Archival black ink and added some Nuvo Drops.


Thanks so much for coming by and taking a look.

Adding my card to these challenges:

Simon Says Monday- HAPPY BIRTHDAY
Dare 2B Artzy- PASTEL COLOURS
Stamping Sensations- ANYTHING GOES
Love to Create- ANYTHING CREATIVE/MIXED MEDIA


Supplies
Stamps- Shattered Glass (Local King); Handwritten Happiness (MFT)
Inks- DOX-Faded Jeans, Wilted Violet, Cracked Pistachio, Spiced Marmalade,
Broken China (TH); Versamark; Archival Black (Ranger)
Paper- heavy white (local store)
Accessories and Tools- Misti; clear eb powder; heat tool; Nuvo Drops; pop dots

Sunday 6 August 2017

Marbled Magic- Tutorial

Meet today's card. 
I called it Marbled Magic.  I love making marbled paper and I want to show you how super easy it is to create!
This card used a lovely recycled heart from a greeting card I received.

I took step-by step pictures to give you a better idea of what to do. 
I hope they help you see how it's done.
 So here we go.


Step One
Fill a container that is larger then the size of you cardstock piece and with approx. 2 inches of water.  I use an old container for this as you may get some staining.


Step 2
Randomly drop some nail polish over the surface of the water.  I try and spread them across the surface of the water.


Step 3
Next, take a small skewer and swirl the nail polish around in the water a bit.  It may stick a bit to the stick but if you lift it out quickly it shouldn't be a problem.
Now lay your piece of cardstock onto the surface of the water.
I used a heavy weight cardstock for mine.


Step 4
Lift it quickly out of the water and set aside to dry completely.
Your marbled paper is ready to use.


Well there you go and by the way, here is the nail polish I used which I bought at the Dollar Store.
*EDITED TO INCLUDE:  I recently tried using the Gel Nail Polish with not as nice results
so I suggest sticking with the regular kind.*


I hope you enjoyed this tutorial and that you will give it a try.


Adding my card to these challenges:

 Love to Create- ANYTHING CREATIVE/MIXED MEDIA
Dare 2B Artzy- PASTEL COLOURS
Glitter 'N' Sparkle- MONOCHROMATIC
Pile It On- RECYCLE


Supplies
Stamps- None
Ink-None
Paper- heavy weight white (local store)
Accessories and Tools- container for water, skewer, nail polish, recycled heart

Saturday 5 August 2017

Art of God

Happy Saturday and time to play.

I just picked up some new flower stamps from Magenta and wanted to play with them on my inky bkg.
So onto the card details.

Often, when I am working on a card either painting with inks or creating a background, I press the inks directly onto my non-stick craft sheet and use the inks from there.  I always have some leftover and that is how this card came to be.
I was using my Distress Oxides for another project, there was some ink left on my non-stick pad so I sprayed with water and pressed a piece of crumpled up plastic wrap into the wet ink and pounced over my white card front and the bkg was born.  Love how the DOX's layer and it is such a super easy way to make background for your cards easily and with things you already have on hand.
Next, I placed the stamps inside my Misti, inked with Archival black and stamped the silhouettes.
The sentiment is a new one to me from Technique Junkies.


 Hope you give it a try and thanks again for the visit!

Little Red Wagon- FAV PRODUCTS
(DOX)
Crazy 4 Challenges- BRIGHT AND CHEERFUL
Craft Stamper Magazine- ANYTHING STAMPED GOES
Use Your Stuff- FREE WK


Supplies
Stamps- Art of God (Technique Junkies); Flower Silhouette, Lavender Silhouette, 
Long Twig Flowers (Magenta)
Ink- DOX: Broken China, Faded Jeans, Wilted Violet (TH); Archival Black (Ranger)
Paper- heavy white (local store)
Accessories and Tools- Misti; plastic wrap; Mister (TH)

Friday 4 August 2017

Simplicity- The Flower Challenge

Good Morning.
Meet today's card and time for more fun at 
This month our theme is Background Stamping.

http://theflowerchallenge.blogspot.ca/


I decided to create a very clean and simple card.
I began by masking the edges of my heavy white cardstock with Painter's Tape.  I placed the PB stamp called Glory of Modesty into my Misti, inked with Broken China DOX, sprayed with water and pressed it onto my paper.  I love how the edges were undefined and added to the look of the loose flower vines.
To help make the flowers pop, I went back in with my Zigs and added colour just around the outside edges.
 I stamped the sentiment from Happy Wishes and mounted the piece onto more white cardstock to keep it clean and simple.


Thanks so very much for coming by and taking a look.
On a personal note:  I am super busy with 5 little daycare kiddos for the summer/10 hrs a day.
I so appreciate all your most kind comments and visits.  
I am doing my best to visit your blogs and answer all your emails.  Please keep persevering with me during this hectic time. 
Thanks.

Adding my card to these challenges;

Craft Stamper Magazine- ANYTHING STAMPED GOES
Crafting With Attitude- ANYTHING GOES
Simply Papercraft- ANYTHING GOES


Supplies
Stamps:  Glory of Modesty, Happy Wishes (Penny Black)
Ink- Broken China Distress Oxide (TH); Tuxedo Black Memento
Paper- heavy white (local store)
Accessories and Tools- Misti, painter's tape, Zigs

Wednesday 2 August 2017

Just Add Salt- CAS Watercolour Challenge

Welcome to another addition of the 

This month we have a fun one for you....SALT.

There are some great links on the Challenge Blog to help get you started.

So onto my card.
I haven't done the Embossing Folder Stamping Technique for so long and wanted to try it out using my Distress Oxide inks.  Basically what you do is rub ink over the raised area of your embossing folder, spray with water, then press the ink onto you paper.  It is such a great way to get some further mileage from all your embossing folders.

I rubbed my folder with Peeled Paint Distress Oxide ink, sprayed with water then pressed onto my heavy weight cardstock.  While the paper was still wet, I sprinkled on some coarse sea salt.  The salt absorbs the ink but in this case, the salt changed the colour of the ink....so fun! 
 Be sure to set the piece aside and let it dry completely before removing the salt.

Next, I placed the inked piece inside my Misti, inked up the flower stamp and pressed onto my paper.
I stamped the sentiment from IO then lightly sponged the edges with more ink.


Hope you can play along with us.
Thanks for the visit.


Adding my card to these challenges:

Little Red Wagon- FAV PRODUCTS
DOX's
Simon Says Wed.- SPLATTER IT
Monochromatic Magic- ANYTHING GOES
Crafty Creations- ANYTHING GOES


Supplies
Stamps- Wildflowers (TH); Something Incredible (Impression Obsession)
Ink- Peeled Paint Distress Oxide ink (TH); Tuxedo Black Memento
Paper- heavy white cs (local store)
Accessories- EB Folder Hexagon (SU); mister (TH); sponge applicator (TH); MISTI